Pixel Glitch Shader
Experience precise, pixel-perfect glitch effects tailored for pixel art games! This shader is designed to provide minimalistic, straightforward implementation while offering full control over distortion and chromatic aberration. It's incredibly easy to integrate into your GameMaker Studio 2 projects.
Features:
- Pixel-Accurate: This shader works exactly on a per-pixel level, ensuring your glitches stay sharp and true to your pixel art style.
- Simple & Minimalist: Designed for effortless use. You can quickly add glitch effects to your project with a config script that will help you set up the shader.
- Noise Sprite Control: The shader utilizes a noise sprite to generate the glitch effect.
Explanation:
At the top of this page, try the demo to see the shader in action.
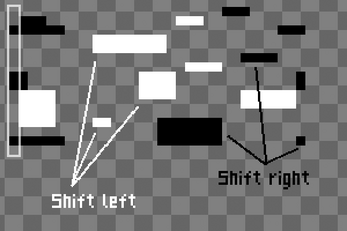
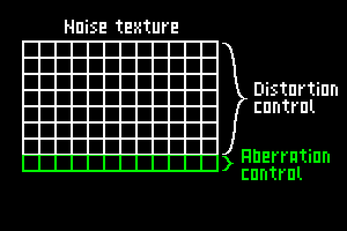
In the top-left corner of the demo, you'll see the noise sprite. For the most part it's controlling distortion: white pixels = shift left, black pixels = shift right, pixel opacity controls distortion intensity (more opasity = more intensity). Last row of noise sprite controls chromatic aberration intensity: whiter pixels = more aberration, blacker pixels = less. You can try different noise examples by using the arrow buttons above noise.
You can also adjust parameters like shader speed, distortion and aberration multipliers in bottom left corner. A distortion multiplier of 1 means that with full noise opacity, the distortion will shift by exactly one pixel. An aberration multiplier of 1 means that with fully white noise (or fully transparent), the aberration will also shift by exactly one pixel.
Plus, there’s an option to import your own image in the bottom-right corner, but it's available only in the downloadable version of the demo due to HTML5 limitations.
Important to know:
If you want to use the shader in your game:
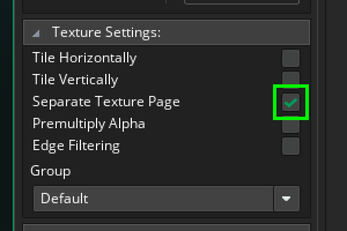
- Ensure the "Separate texture page" option is checked for both the sprite you’re applying the shader to and the noise sprite (not needed if used on a surface).
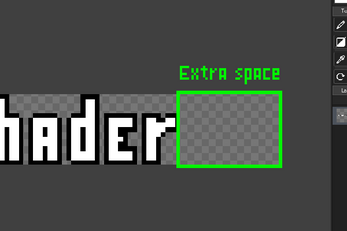
- Make sure the sprite or surface you’re applying the shader to has extra space on the left and right sides, or the shader will clip at the edges (the import button in the demo automatically handles this for you).
- If you scale the image that the shader is applied to and use non-integer values, you may encounter visual bugs. To avoid this, either use whole numbers for scaling or use fractional values that are multiples of 2, such as 1.2, 3.6, 5.8, 0.4, etc.
Like the Shader?
If you enjoy using this glitch shader and find it useful, consider supporting me! Payment is optional, but credits are appreciated (you don't have to if you’ve paid for it). I’d also love to hear about your project using my shader, just out of curiosity.
Download
Click download now to get access to the following files:


Comments
Log in with itch.io to leave a comment.
Hi Duckymite,
Fantastic shader! Using a sprite to determine the frequency and amplitude of the glitch effect is a really cool idea.
This might be out-of-scope, and I recognise that changing it wouldn't technically be a correct representation of the effect, but is it possible for the colours produced by the chromatic aberration effect to be changed?
Hey! Glad you liked the shader. Chromatic aberration works by splitting the image into RGB channels and shifting red to the left and blue to the right. To do the same with other colors, I’d need to write completely new code, and honestly I’m not sure yet how to pull that off. I also don’t have much time to dive into it right now. Doesn’t mean it won’t ever happen — just not at the moment. I’ll check it out when I get a chance.
I kind of figured that would be the case. Don't stress on a rewrite, it's not important, but thanks anyway!
Hey this is super awesome thanks!
I'm experiencing a small issue, the glitch effect is applied, but it doesn't animate.
Help would be appreciated :)
I'm not entirely sure what the issue might be, but I suspect that the time variable isn't set correctly. In the demo, the "Moment" variable represents this (top left corner). Each step, your shader speed value should be added to it, and if it becomes greater than or equal to the width of the noise sprite, it should reset to zero. This variable, along with the other necessary ones, should then be passed to the shader using the
fnc_glitch_configfunction.Hope this helps!
that was it! the moment wasn't defined correctly!
Unfortunately, another minor bug has arisen. The sprite now animates, but chromic aberration disappears when the actual animation takes place. What i mean is, when the texture 'breaks' into little pieces, the aberration stops taking place.
thanks for being helpful :)
*edit* Just noticed this, but the glitch effect doesn't seem to be being applied correctly, the result doesn't match the sprite (im using the demo noise 5)
There can be various reasons why the aberration effect isn't showing up. Make sure that the "separate texture page" option is enabled for the sprite you're applying the shader to and noise sprite. You can find this setting in the sprite editor, on the left side under the "texture settings" tab. Also, in the noise sprite, the last row controls the aberration. If it's completely black, there will be no aberration; if it's white, the aberration will appear. Additionally, in the
fnc_glitch_configfunction, there's an optional aberration modifier. If it's set to zero, there will be no aberration either, but that's unlikely to be the issue. If you're using thenoise5sprite from the demo, it's most likely related to the "separate texture page" setting.As for the issue where the effect in
noise5doesn't match the sprite, if I understood you correctly, here's the explanation: the pre-made noise sprites are designed to demonstrate different capabilities of the shader. Specifically,noise5is semi-transparent, and transparency controls the distortion strength. Innoise5, as you might notice, the black pixels are half-transparent, while the white ones are 25% transparent. This results in the distortion shifting the image by exactly half a pixel or a quarter a pixel, respectively.The same principle applies to the aberration. If you look at the last row of
noise5, it's almost entirely gray—exactly halfway between black and white—which means the aberration will shift by half a pixel as well. If you want everything to shift precisely by whole pixels, avoid using transparency for distortion and keep the last row fully white for aberration.If this isn't the issue you were referring to, then it's likely that you're passing the wrong sprite width and sprite height values to the
fnc_glitch_configfunction. These should be the dimensions of the sprite you're applying the shader to, and it's better to usesprite_get_width(sprite_index)andsprite_get_height(sprite_index)to retrieve these values. If you scale your object, the standardsprite_widthandsprite_heightchange proportionally with the object, which would result in incorrect data being passed to the shader.If you have any more questions, feel free to ask—I'm happy to help! :)
i changed sprite_width and sprite_height to
sprite_get_width(sprite_index)andsprite_get_height(sprite_index)I tried changing the texture of the noise sprite to not have the opacity it previously featured, so it should do it by one pixel (the project I'm working on is pretty low in resolution). However, it didn't seem to do anything.Heres the code in my 'Draw' step right now:
moment += spd;
if moment >= sprite_get_width(spr_noise){ moment = 0 } shader_set(shd_glitch)
fnc_glitch_config(moment, spr_noise, sprite_get_width(sprite_index) / image_xscale, sprite_get_height(sprite_index) / image_yscale, 1, 1)
draw_self()
shader_reset()
is there a way i can export from the demo? What i mean is, import the sprite, do the glitch config through the demo, then copy+paste over to my game?
I can provide more information if necessary.
I tried your code, and first, it seems I didn’t explain the use of
sprite_get_widthandsprite_get_heightcorrectly. Actually, you need to either dividesprite_widthbyimage_xscaleor usesprite_get_width(sprite_index). I just didn’t expect you to haveimage_xscaleapplied in your case. So, when usingsprite_get_width, there’s no need to divide by scale.As for the code: it’s correct, and the issue could come from two things—either the "separate texture page" option isn’t enabled for the sprite/noise, or it’s related to scaling, which I didn’t mention earlier. The thing is, if you scale the object that uses the shader, it will only display correctly at whole number scales. Using non-integer scaling will make the shader behave inaccurately, not pixel-perfect.
I was aware of this issue before, but honestly, I don’t know exactly why it happens or how to fix it—or if it even needs fixing, since pixel art rarely scales at non-integer values. If scaling is the issue, I’m afraid I can’t help much for now. As I mentioned, the only solution is to use whole numbers for scaling.
If the problem isn’t with the "separate texture page" setting and you aren’t using non-integer scaling, I’m not sure what else it could be, since everything works fine on my end with your code. Please send me the dimensions of the sprite you’re using with the shader. When I initially created the shader, I noticed some issues with specific dimensions and fixed them, but it’s possible your case wasn’t covered. However, I’m fairly certain the issue is either related to scaling or the "separate texture page" setting.